
Homeowners: Check Fan Airflow to Fix Peeling Bathroom Paint
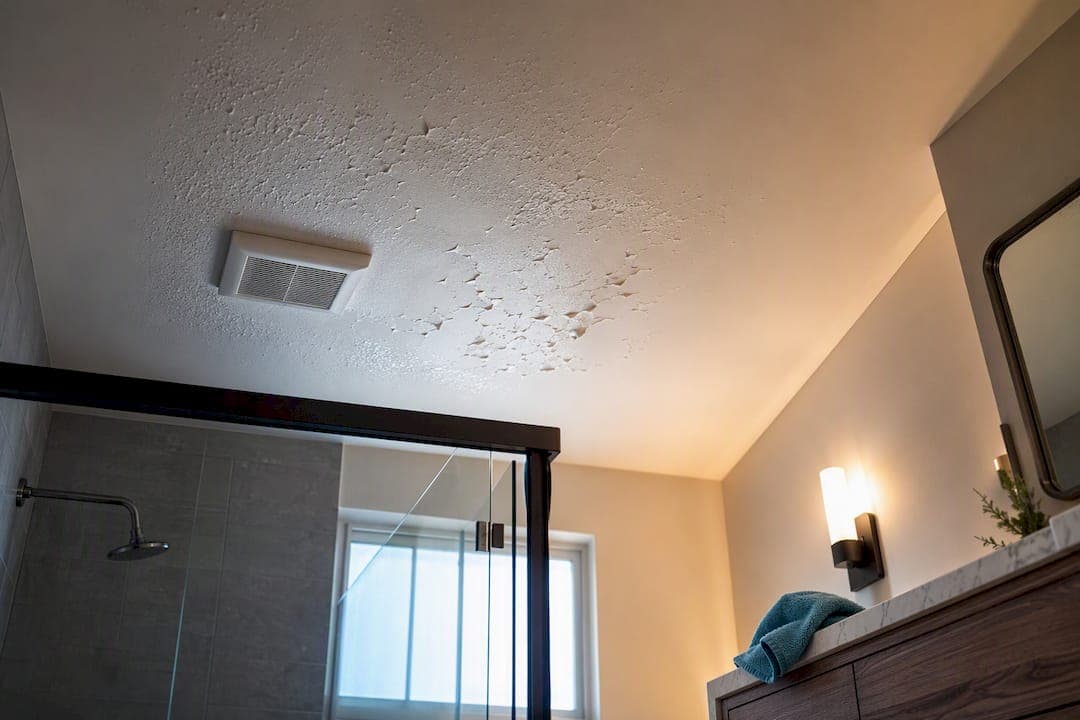
Bathroom paint peels because moisture has broken the bond between the paint film and the wall, not because you used cheap paint. The fix that actually holds isn’t a fresh coat, it’s finding and stopping the moisture source first. If you see mold, active dripping, or soft drywall, pause the DIY plan and investigate before touching a scraper. Otherwise, the repair workflow below will get you a finish that lasts.
TL;DR:
- Moisture trapped behind bathroom paint often causes peeling, especially when drywall feels soft, shows stains, or there is a persistent musty odor.
- Ventilation issues, leaks, and poor surface preparation are common causes; a weak exhaust fan or high humidity levels over 60% can trap moisture inside walls.
- Proper repair requires scraping loose paint, repairing damaged drywall, thorough drying for 48 to 72 hours, and using moisture-resistant primer before repainting.
- Using satin or semi-gloss paints with moisture-resistant primer helps prevent future peeling in high-humidity environments.
- Persistent problems or soft drywall indicate the need for professional assessment and repair rather than ongoing DIY attempts.
Table of Contents
- What Causes Peeling Bathroom Paint: Condensation, Leaks, or Bad Prep?
- Is Your Bathroom Paint Peeling From Mold, a Leak, or Bad Ventilation?
- How to Fix Peeling Bathroom Paint Yourself
- How Long Should Bathroom Paint Dry Before Repainting?
- What Primer and Paint Work Best for Peeling Bathroom Walls?
- How Do You Stop Bathroom Paint From Peeling Again?
- When Should You Call a Professional for Peeling Bathroom Paint?
- Which Paint Should You Use in a High-Humidity Bathroom?
- How Do You Repair Drywall Damage Before Repainting a Bathroom?
- What a DIYer Should Actually Prioritize First
- Get Professional Help for Bathroom Moisture and Paint Repair
- Sources
- FAQ
What Causes Peeling Bathroom Paint: Condensation, Leaks, or Bad Prep?
Where the paint is failing tells you almost everything. Peeling that starts on the ceiling directly over the shower or tub is usually a ventilation problem. Warm, humid air rises, hits the cooler ceiling surface, and condenses there first, which is why that spot fails before anywhere else in the room. Peeling on lower walls, especially near a toilet, sink cabinet, or exterior wall, points more toward liquid water intrusion, plumbing leaks, or a roof or window issue rather than steam alone.
A 10-minute hot shower can push bathroom humidity to 90 to 100%, and that moisture load hits the paint film dozens of times a month. Over time it works into hairline drywall cracks and seams, breaking adhesion from underneath rather than the surface.
Watch for these signs as you inspect:
- Musty or earthy odor near the peeling area, even after cleaning
- Soft, spongy, or bubbling drywall when you press gently
- Dark speckling or staining that spreads beyond the paint chip itself
- Peeling concentrated at seams, corners, or around light fixtures, which suggests a structural or plumbing origin rather than simple condensation
If you see mold or the drywall feels soft, that’s not a paint problem anymore. That’s a moisture and possibly a structural repair problem, and it changes your next move entirely.
Is Your Bathroom Paint Peeling From Mold, a Leak, or Bad Ventilation?
Run through this before you buy a single supply:
- Smell and press test. Get close to the peeling area. A musty smell combined with drywall that gives under light finger pressure means water has been sitting in that wall longer than a single steamy shower explains.
- Check the fan. Turn it on and hold a tissue near the grille. Weak or no pull means the fan or its ducting isn’t doing its job, even if it sounds like it’s running.
- Take a humidity reading after a shower. A hygrometer should show levels dropping below 60% within 30 to 60 minutes if the fan is actually venting outside.
- Note repeat failures. If the same spot has peeled more than once after a previous repaint, moisture is trapped behind the wall, not just landing on its surface.
Pass all four checks with no mold or softness? You’re clear to repair it yourself.
How to Fix Peeling Bathroom Paint Yourself
Sherwin-Williams’ repair process for flaking and peeling paint boils down to four moves: remove, repair, prime, repaint. Skipping any one of them is why so many bathroom repaints fail again within a year.
Gear up first. Wear a dust mask and safety glasses, and if you have any doubt about mold, stop here and read the diagnostic checklist above again before you disturb the surface.
What you’ll need:
- Stiff putty knife or 5-in-1 tool for scraping
- 120 and 220 grit sandpaper for feathering edges
- Lightweight spackle or setting-type joint compound
- TSP substitute or a degreasing cleaner for soap scum
- Drywall patch kit if the damage goes deeper than surface paint
Scrape all loose and bubbling paint back to a solid, firmly adhered edge. Don’t just knock off the visible flakes; work outward until the knife stops catching. Feather-sand the transition between bare drywall and intact paint so there’s no visible ridge once you prime. Wipe the whole area down with a degreasing cleaner to strip soap film and body oils, since paint won’t grip over residue no matter how good the primer is.
If the drywall paper is torn, bubbled, or crumbling, a skim coat of joint compound over the damaged spot is usually enough. But if the drywall core is soft, discolored, or crumbles under light pressure, cut it back to the nearest studs and patch in new drywall rather than trying to skim-coat over a compromised substrate. A drywall repair professional can handle this cleanly if the damaged section is larger than a dinner plate.
Pro Tip: Cut patches into a square or rectangle with straight edges instead of following the peeling’s irregular shape. Straight cuts feather and blend far more invisibly than a jagged patch ever will.
How Long Should Bathroom Paint Dry Before Repainting?
Rushing this step is the single most common reason a bathroom repaint fails again within months. Any area that was scraped, patched, or exposed to standing moisture needs real drying time, not a quick once-over with a towel.
Give patched or heavily wetted areas 48 to 72 hours to dry fully before priming, running a box fan and a dehumidifier in the room to speed things along. Humidity trapped behind fresh joint compound has nowhere to go once you seal it with primer, and that’s exactly how you get a second round of bubbling six months later.
A cheap hygrometer, the kind sold for under $15 at most hardware stores, tells you what your eyes can’t. After a normal shower, humidity should fall below 60% within 30 to 60 minutes if ventilation is working and the wall has dried out. If it’s still climbing or staying elevated well past that window, something behind the wall is holding moisture, and priming now will only trap it.
Before priming:
- Wipe down with a mild degreaser to remove soap film and any mildew residue
- Let the surface dry completely to the touch, not just look dry
- Confirm with a hygrometer reading rather than guessing by feel
What Primer and Paint Work Best for Peeling Bathroom Walls?
Primer isn’t optional in a bathroom repair, it’s the layer that actually blocks moisture and stains from bleeding through your new topcoat. Skip it and even the best paint will eventually telegraph the old stain or fail at the same spot again.
You have two solid primer routes. Oil-based or shellac-based primers seal stains and old water marks more aggressively and dry to a harder barrier, but they carry stronger fumes and need mineral spirits for cleanup. Waterborne, moisture-resistant primers labeled for bath and kitchen use are easier to work with, lower odor, and perform well for most condensation-driven peeling that isn’t leaving a visible stain.
For topcoat, satin or semi-gloss finishes outperform flat or eggshell in a bathroom every time. The tighter sheen resists moisture penetration and wipes clean without burnishing, which matters when you’re scrubbing soap scum off the wall every week.
Application basics that actually matter:
- Apply primer in thin, even coats rather than one heavy pass that can sag or trap air
- Extend primer several inches beyond the repaired patch so the old and new surfaces blend under one continuous layer
- Let primer cure fully per the label before topcoating, since a rushed recoat is one more way moisture gets trapped
How Do You Stop Bathroom Paint From Peeling Again?
Ventilation, done properly, fixes most interior moisture problems before they ever reach the paint. This is the step homeowners skip because it’s invisible work, and it’s exactly why the same wall peels again two years later.
Confirm your exhaust fan actually vents to the outside, not into an attic or ceiling cavity, since dumping moist air into an unfinished space just relocates the mold risk instead of removing it. Run the fan for a solid 20 to 30 minutes after every shower, or better yet, install a humidistat-controlled switch that keeps it running automatically until humidity drops. Extending fan runtime and adding a humidistat measurably improves how long a bathroom repaint holds up.
Small habits add up too:
- Crack a window or leave the door ajar for 15 minutes after showering when weather allows
- Clean the fan grille every few months since dust buildup quietly kills airflow
- Keep a cheap hygrometer on the counter so you notice creeping humidity before it shows up as paint failure
Pro Tip: If your fan sounds strong but a tissue barely moves at the grille, the ducting itself is likely clogged or crushed somewhere in the attic, not the fan motor.
When Should You Call a Professional for Peeling Bathroom Paint?
Some signs mean it’s time to stop scraping and start dialing. Soft or crumbling drywall, peeling that returns in the same spot after a proper repaint, staining that keeps spreading, or a musty smell that won’t clear are all hard stops for a DIY fix.
Here’s who handles what:
- Confirmed active leak behind the wall — call a plumber for leak detection before any cosmetic work begins
- Visible mold or recurring growth after cleaning — bring in a mold remediation specialist to test and treat before repainting
Which Paint Should You Use in a High-Humidity Bathroom?
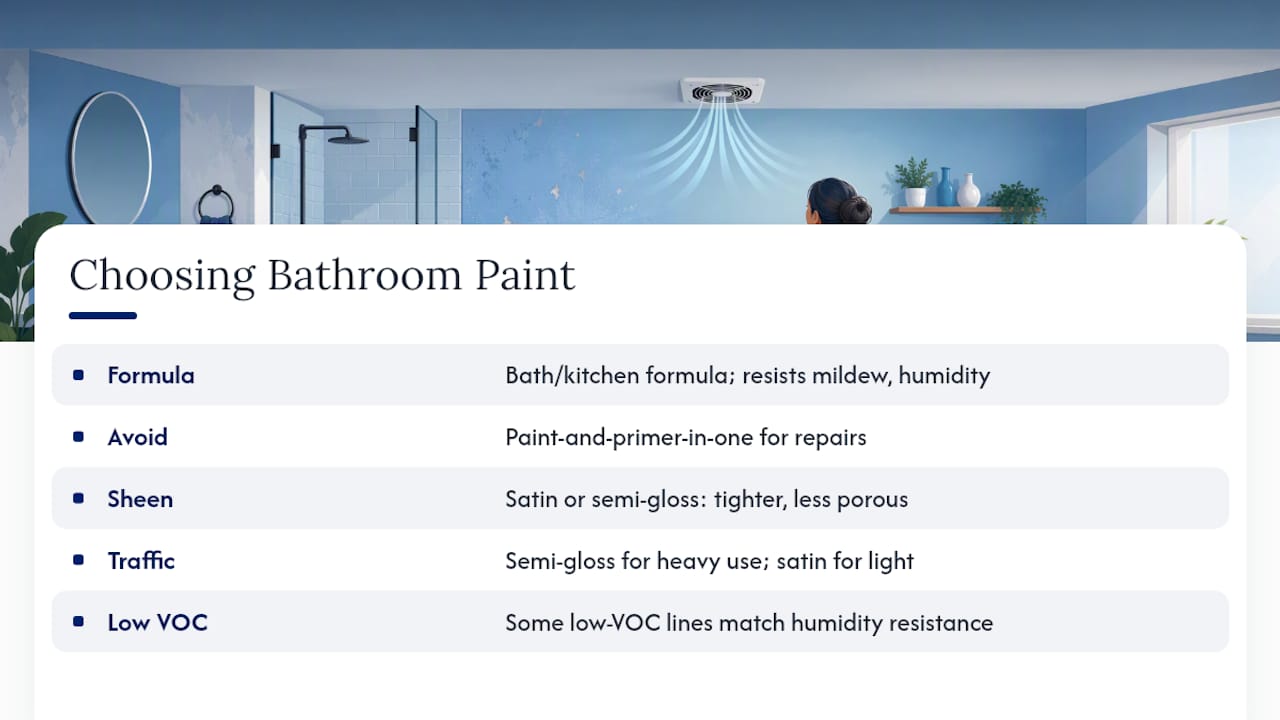
Not every paint labeled “bathroom safe” is actually built to handle steady steam exposure, and picking the wrong one is a quiet way to guarantee a repeat of the same problem.
Look for paint specifically formulated for bath and kitchen use rather than a generic interior can. These formulas include additives that resist mildew growth on the cured film and hold up to repeated humidity cycles without softening. Skip paint-and-primer-in-one products for this job; they’re convenient for a quick refresh on a healthy wall, but they don’t offer the dedicated stain-blocking or moisture-sealing power a bathroom repair actually needs after a peeling incident.
Sheen matters just as much as the formula. Satin and semi-gloss finishes create a tighter, less porous surface than flat or matte paint, which means less opportunity for water vapor to work its way in behind the film. That tighter surface also wipes clean without leaving a dull patch, which matters in a room where soap splatter and toothpaste flecks are a weekly occurrence.
If the room gets heavy daily use, like a family bathroom with multiple showers a day, lean toward semi-gloss over satin for the extra durability. A guest bathroom with lighter traffic can usually get away with satin and still hold up for years.
One more detail worth checking: some low VOC paint lines now perform just as well in humidity resistance as traditional high VOC formulas, so you don’t have to trade air quality for durability anymore. That’s a meaningful shift from where bathroom paint options stood even five years ago.
How Do You Repair Drywall Damage Before Repainting a Bathroom?
Painting over damaged drywall is the fastest way to waste a weekend. The surface might look fine for a few weeks before the same bubbling or cracking reappears, because the substrate underneath was never actually sound.
Start by mapping the damage. Press along the entire peeling area and a few inches beyond it, not just the spot that looks bad. Drywall that flexes, feels damp, or crumbles at the edges extends further than the visible paint failure usually suggests. Hairline cracks radiating from a peeling patch often indicate the drywall tape underneath has separated from settling or repeated moisture cycles, and simple spackle won’t hold there long term.
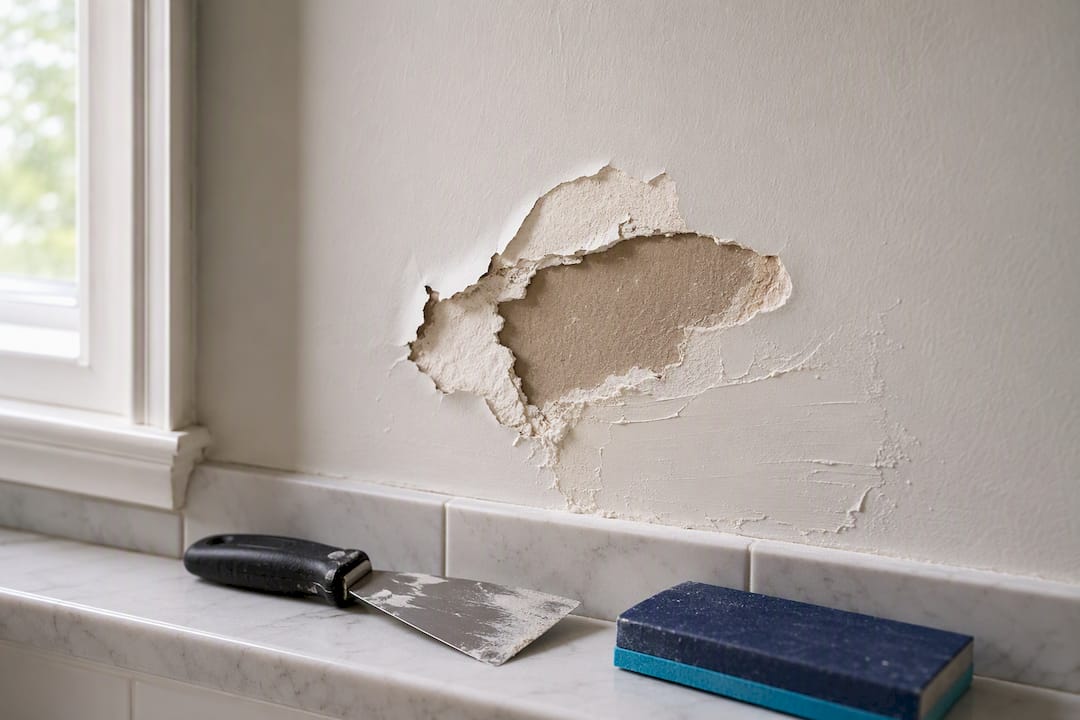
For surface-level damage where the paper face is intact but chipped, a setting-type joint compound applied in two thin coats, sanded smooth between each, restores a paintable surface. For plaster walls in older homes, the process is similar but plaster patch compound bonds better to the original material than standard drywall mud.
Never paint over drywall that’s saturated or where mold keeps returning after cleaning and priming. At that point, the only permanent fix is cutting the damaged section out to the nearest studs and installing new drywall, taping and mudding the seams to blend with the surrounding wall. It’s more work upfront, but it’s the difference between a repair that lasts and one you’ll be redoing again next year.
What a DIYer Should Actually Prioritize First
Chasing the wrong problem is the most expensive mistake in this whole process. Stop the moisture source before you buy a single can of paint, then repair the substrate properly, and finish with a primer and finish built for humidity.
Three rules worth pinning to your bathroom door: check your fan’s actual airflow before blaming the paint, never skip the drying window between patching and priming, and treat any soft drywall as a signal to slow down, not push through. DIY works well here right up until you hit mold or structural softness. Past that line, a professional visit costs less than repeating the repair twice.
— Van Castaneda
Get Professional Help for Bathroom Moisture and Paint Repair
Some peeling problems go deeper than a weekend project, and a coordinated service can be a practical alternative to hiring three separate contractors for one bathroom. Instead of coordinating a plumber, a drywall crew, and a painter separately, one coordinated service can trace an active leak, patch or replace damaged drywall, and repaint with a moisture-resistant finish in a single coordinated job.

A typical service visit starts with a straightforward assessment: is this ventilation, a leak, or both? From there, the technician can move directly into leak detection if plumbing is the source, drywall repair for any compromised substrate, and a proper primer-and-paint job that’s built to hold up in Cerritos and Long Beach area bathrooms specifically. This is the right call once you’ve spotted soft drywall, a recurring peel, or a musty smell that cleaning won’t touch.
Browse recent drywall and painting work to see the kind of finish quality to expect, then request an estimate through the handyman services page to get a technician scheduled for your bathroom.
Sources
- A brief guide to mold, moisture, and your home — EPA
- How to Fix Flaking, Cracking, and Peeling Paint — Sherwin-Williams
- Paint peeling in the bathroom: humidity fixes that work — Dry Nest Lab
FAQ
Does Peeling Paint in the Bathroom Mean Mold?
Not always, but it can. Peeling itself usually signals moisture behind the paint film, and if you also notice a musty smell, soft drywall, or dark speckling, mold is a real possibility that warrants testing before you repaint.
Can I Just Paint Over Peeling Paint?
No. Painting over peeling paint without scraping, repairing the substrate, and priming will fail again within months, since the new coat has nothing solid to bond to underneath the loose paint.
My Bathroom Ceiling Paint Is Peeling. What Can I Do to Fix It?
Ceiling peeling above a shower is almost always a ventilation issue, so confirm your exhaust fan vents outside and runs long enough after showers. Then scrape, dry the area for 48 to 72 hours, prime with a moisture-resistant primer, and repaint with satin or semi-gloss.
My Bathroom Tub Paint Is Peeling. How Can I Fix It?
If you’re seeing peeling on painted tub surrounds or nearby walls, first rule out an active leak from tub fittings or grout failure, since that’s a liquid water problem rather than steam. Once the leak is ruled out or repaired, follow the same scrape, dry, prime, and repaint sequence used elsewhere in the bathroom.
When Should I Hire a Professional Instead of Fixing It Myself?
Call a professional when drywall feels soft or spongy, peeling keeps returning in the same spot, or you smell mustiness that cleaning doesn’t resolve. A service like System Wide Services can diagnose leaks, repair drywall, and repaint in one visit rather than guessing your way through repeated fixes.
Recommended
Need a hand with this? We've got you covered.
System Wide Services handles plumbing, electrical, and handyman work across Long Beach and LA & Orange County.